How to generate a star pattern using Informatica

Question:- To generate a star pattern using Informatica depending on the number of rows in the input file

Suppose there are 7 rows in the source file (any type of data),  the target should have 7 rows of stars in the following pattern:-
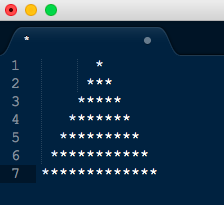
FinalStarPattern

Fig1
Solution:-
There are two ways of doing this – first is to use a Java transformation in passive mode and second is without using a java transformation.

Doing it WITHOUT a Java transformation is challenging hence I will describe this method in this post.  Java transformation based solution will be posted later.

Solution with Java Transformation

We can observe the following about the pattern we are generating:-
1. First line has 7 spaces before the star, second has 6 and so on. Hence the spaces in front are decreasing by 1 for each row. The number of spaces in first row is equal to the number of rows in the source file and number of spaces in front for the last row is zero

2. The number of stars are increasing by two after the first row. 1,3,5 and so on

As we are doing this without a java transformation, the trick lies in how we generate variable number of stars and spaces for each row.

Algorithm:-

1. First generate only the stars as in below pattern
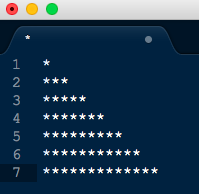
Int1StarPattern

Fig2

2. Sort the above pattern in descending order to generate the pattern below
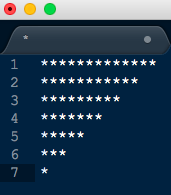
InvInt1StarPattern

Fig 3

3. Add spaces to the pattern, starting with zero spaces in first line and increasing it by one for each subsequent row to get the following pattern:-
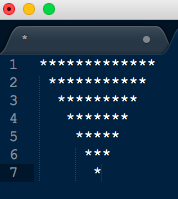
InvFinalStarPattern

Fig 4

4. Sort again, this time in ascending order to get the final pattern

FinalStarPattern

Fig 5

The mapping will also include one pipeline to get the count of the rows in the file. This will be used in the main flow to generate the star pattern.

Complete mapping will look like below (click on the image to enlarge):-

CompleMappingIconic

Mapping Variable:- $$ROWCOUNT

Target Load Plan:- SQ_FF_TEST_SRC first (to count the number of rows)

Mapping Explanation:-

First pipeline to count number of rows in the file

1. Use an aggregator to count the number of rows in the file like below (agg_count_rows)

agg_count_rows

2. Use an expression transformation to assign the count value to a mapping variable (exp_set_row_count_variable)

exp_set_row_count_var

3. Connect both ports from the above expression to a dummy target file.

Second Pipeline to produce star pattern

1. Expression to get the row count variable value in the pipeline and also generate a sequence for each row starting from one (exp_seq_row_count)

exp_seq_row_count

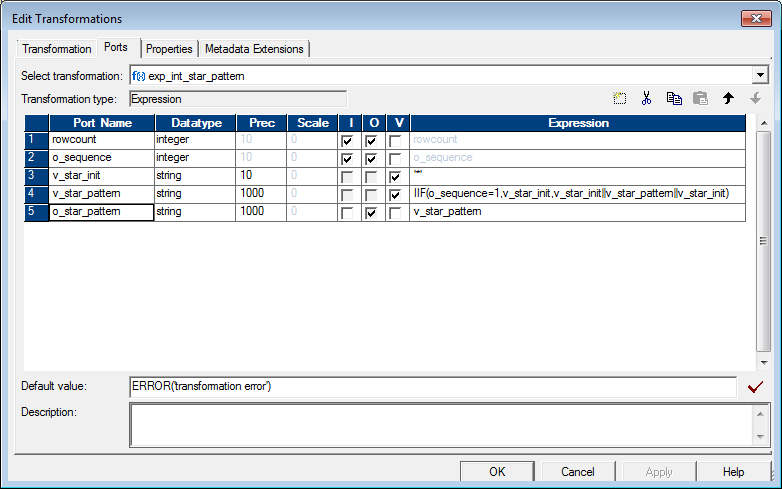
2. Expression to generate intermediate start pattern as in Fig 2 above (exp_int_star_pattern)

exp_int_star_pattern

3. Sorter to sort the intermediate pattern in descending order (sort_desc)

srt_desc

4. Expression to add spaces to the sorted pattern (ex_add_spaces_to_pattern)

exp_add_spaces_to_patt

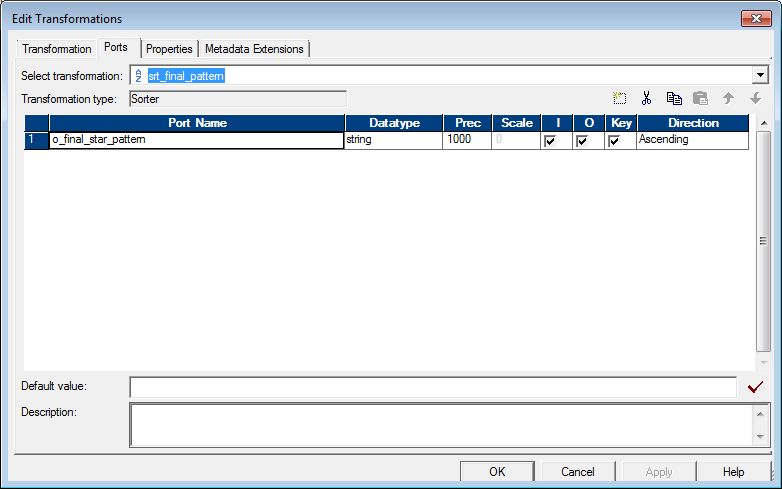
5. Sorter to again sort the pattern in ascending order to generate the final star pattern (srt_final_pattern)

srt_final_pattern

Place a source file with any number of rows, result you will get is lot of stars!!

Let me know in comments if you need any clarifications or if you have any feedback.

How to Load Only the first row and last row from a file to a target file using aggregator

This post describes another way of loading the first and last rows. This time using the aggregator transformation. Please see my previous post if you want to know how to do this using a Rank Transformation.(Using Rank Transformation)

Here we are going to use the default behaviour of the Aggregator transformation to get the last row from the file. In an aggregator if you do not specify any group by port it lets pass only the last row from the complete dataset.

Therefore create two pipelines from the source one to find first row similar to the way we did in the mapping with Rank transformation and second to feed an aggregator without any group by port to get the last row.

Use an Union transformation to combine the two dataflows and connect it to a target.

This will give you the simplest way of finding first and last row from a source file.

Let me know if you need any more information in the comments below.

How to load only the first and last row from a flat file to a target file using Rank transformation?

This is a common interview question which can really test the candidates’ knowledge of informatica transformations and logical thinking.

The caveat here is you have to do this without using any pre-session commands

So here we need to single out the first and last row from the source file. Lets take an example source file with 5 rows delimited by commas.

a,”Go To Market”
c,”Find a soap”
e,”Take it to cashier”
b,”Make Payment”
d,”Come home”

Now our task is to populate a target file with the first and last row, so that it looks like as below

a,”Go To Market”
d,”Come home”

Given this task we can break into three steps
1. Find the first row from the file
2. Find the last row from the file
3. Combine the two and load it to target table

Lets take each of the above individually

STEP1. Find the first row from the file
This can be easily done by assigning a unique number, starting from 1, to each incoming row.
Then filtering out the rest except for the row with number assigned as 1. This will be the first row

HOW TO GENERATE UNIQUE NUMBER FOR EACH ROW?
Two methods – either use sequence generator or use expression variables to generate sequence numbers. I would prefer expression transformation. Here’s how you do it in an expression

1. Use expression transformation and create an integer variable port named v_sequence and put the following expression in the expression editor:

IIF(v_sequence=0,1,v_sequence+1)

This clause takes advantage of the informatica property to assign default values of 0 to integer ports.

2. Create an output port o_sequence and assign v_sequence to it in the expression editor.

3. From this expression feed the filter_first, which will let only the row with o_sequence =1 pass through (i.e. first row) and the Rank transformation which will give us the last row.

In addition to above also create a constant output port o_constant and set its value to 1.

Connect the fields from the file and the o_sequence and o_constant fields to the rank transformation for the last row.

STEP2. Find the last row from the file
This can be easily done by using the Informatica Rank transformation. Use the unique number as assigned to the rows in step above as the port to rank on. The highest number will get the top most rank that is 1. So we can then have a filter which will let pass only the row with RANKINDEX =1.

HOW TO FIND THE LAST ROW USING RANK
1. Use the o_constant field to group by on(check Group by Property) and use the o_sequence field to rank on(check R property). Also in properties select TOP as ranking order.

2. From this rank transformation connect all file fields and RANKINDEX field to a filter_last transformation where put the filter condition as RANKINDEX=1 which will let only the last row pass through.

STEP3. Combine the two rows and load the target file
Use Union operator to combine the two flows for first and last row and load the target.

This is self explanatory. In union transformation create two input groups connect each to first and last flow respectively. Connect the output to the target.

This question tests the knowledge of following transformations
1. Expression
2. Rank
3. Filter
4. Union

This can also be done by using Aggregator transformations but I believe it is not an elegant solution as the one described above.

And that is it! You have the first and last row.

Another way using aggregator

How to run concurrent/multiple instances of an Informatica workflow?

By default Informatica workflows cannot be triggered again if they are already running. But there are scenarios where we need to trigger multiple instances of the same workflow. One such example could be when you need to load multiple source files through a single workflow, which gets triggered as soon as the file arrives.

So how do you enable a workflow to run multiple instances concurrently?

Well, there is a flag in the workflow properties which we need to turn on. Below are the steps to achieve this:-

Step1:- Open the workflow in workflow monitor and select the Edit Workflow/Worklet
in the right click command menu for the workflow.

Step2:- In the general tab enable the property Configure Concurrent Execution.

Step3:- Open the Configure Concurrent Execution dialogue box. There are two options-
a. Allow concurrent run with same instance name
The workflow name remains same for every concurrent execution.
b. Allow concurrent run only with unique instance names
Here you will need to create at least one instance name in the lower half
of this dialogue box. You can also specify the parameter file for each
instance

Now you can run different instances by selecting the Start Workflow Advanced option in the workflow right click command menu. Here you can select which instance(s) you need to run.

However in production environment we execute the workflows from bat or shell scripts. You can also trigger multiple instances of the workflow from pmcmd command if the workflow is enabled for concurrent execution. In this case you can leave the property (a) in step 3 selected.

Below is the command using which you can start and name a particular instance of the same workflow.

pmcmd %workflow_name% %informatica_folder_name% -paramfile %paramfilepathandname% -rin %instance_name%

Using this command you can run as many instances of a single workflow with unique instance names appended to the original workflow name.

This will help you in creating minimal code for maximum functionality.

Enjoy learning!!

How to download WWDC 2014 videos on your mac?

Apple does not allow you to download the WWDC videos locally, hence I found this way to download the videos for offline use. This might be useful in countries where the internet speed is slow.

Following is the 5 step process to download any WWDC 2014 video to your mac.

Step1:- Open the  link “https://developer.apple.com/videos/wwdc/2014/”    in your web browser. and login with your developer account if prompted

Step2:- Save the html page as video.html in a folder on your mac.
ex: ~/Documents/wwdc2014/video.html

by going  to File Menu -> Save As command in your web browser

Step3:- Run the following commands in terminal
1) Navigate to where you saved your video.html file
cd ~/Documents/wwdc/2014

2) Get a list of SD video links
For SD vidoes (low quality, small file size)
grep ".mov" video.html| grep "_sd_" |cut -d'"' -f4

3) OR Get a list of HD video links
For HD vidoes (high quality, huge file size)
grep ".mov" video.html| grep "_sd_" |cut -d'"' -f2

Step4:- Copy the link (one link at a time) of the video you want to download from the list presented by the above commands in the terminal window.

Then run the following command on your terminal window

curl “paste copied link here” > name_your_video.download

ex:-
RA$ curl http://devstreaming.apple.com/videos/wwdc/2014/143hceerhhc283299/212/102_sd_platforms_state_of_the_union.mov?dl=1 > platforms_state_of_the_union.download

This will start the download of the .mov file

Step5:- Once the download is complete rename the file

mv file_name.download file_name.mov

or by navigating to the folder using the finder.

Voila!! Now you have the WWDC video for offline use. Enjoy learning.

How to optimize lookup conditions for best performance?

Informatica lookup can contain several conditions to match incoming row with the lookup cache. The order of these conditions also determines how much time the lookup takes to match and return a row.

For better performance follow below order to arrange your conditions to get the best performance out of your lookup transformation:-

  • Equal to (=)
  • Less than (<), greater than (>), less than or equal to (<=), greater than or equal to (>=)
  • Not equal to (!=)

Following the above rule ensures the lookup cache is parsed in the most efficient way.

How to handle table or column names with reserved words in Informatica?

In Informatica, while querying a relational source using SQL overrides the session fails if you use words that are defined as keywords in the target database. for example words like USER, MONTH, YEAR etc are reserved keywords in many popular databases. These words are termed as reserved keywords.

In order to query tables or columns with reserved names you have two options:-

1. Enclose the table or column name in double quotes in the SQL query override.

2. Create a file named reswords.txt in your installation directory of the Integration service, (Usually it is server/bin directory) and add all the reserved words in that file. The text is not case sensitive.

You can create a section for each database you are using your integration service with e.g.:-
[ORACLE]
USER
[SQL Server]
MONTH

Integration service at run time will lookup this file and will automatically place quotes around reserved words and then issue the query to the database.

You may need to turn on SQL-92 standards for some database to use quoted identifiers. Use the connection environment SQL to issue the command. For e.g. for MS SQL server issue the following command:-

SET QUOTED_IDENTIFIER ON

Leave a comment if you need any more details.


What is a default lookup query and in which circumstances you should override it?

Informatica Integration service runs a default SQL statement when the first row enters the lookup transformation in the pipeline.

Default Lookup Query
If there is no SQL override and no filter specified the integration service generates a default SQL to query the lookup. It contains following components:-

SELECT:- The select statement includes all the lookup ports in the lookup transformation. You can view the columns of the default SQL if you generate the SQL override query.

ORDER BY:- All columns in the lookup transformation are contained in the order by clause. They appear in the same order as in the transformation. The order by clause does not appear when you generate the SQL override of the default query, but it is present to take effect when integration service executes the session.

SQL Override
If the lookup source is a relational table, you can override the default lookup query by using the SQL Query Override. Following scenarios warrant for overriding the default lookup query:-

1. When you wish to override the default ORDER BY clause to improve the performance. You may choose to have less number of columns in the order by clause as compared to what integration service generates by default. When overriding the default Order by clause, always put a comment notation ‘–‘ at the end of the SQL query override. This will comment out the default Order By clause. If you do not specify the comments notation the integration service will fail the session at run time.

(The exception is when you use pushdown optimization- in such cases you cannot override the default ORDER BY clause)

2. When there is a Reserved Word used as the lookup table or column name. You must enclose the reserved word in quotes in order to let the integration service query the relational table successfully. There is another way to handle reserved words in informatica. More details on this in the below post.

How to handle table or column names with reserved words in Informatica?

3. When you wish to use mapping parameters and variables in the lookup query. You can use any parameter or variable, that you can define in a parameter file, in the SQL override statement. You can also use a parameter or variable as the SQL query for e.g. session parameter $ParamMyLkpOverride can be used as a substitute of lookup query override. You can assign the query from a parameter file. You cannot validate the query override while using parameters or variables as the mapping designer cannot expand them, but it works fine when the session is executed.

4. When you wish to use a WHERE clause to filter out unwanted rows from lookup cache. You should use a filter transformation before the lookup with the same filter clause as the lookup WHERE clause, so that lookup is fed with data that satisfies the filter condition of the lookup.

5. When you wish to modify the lookup data before the integration services caches the rows. For e.g. using conversion functions for dates, multiplying columns etc.
Following guidelines must be observed while overriding the lookup query:-

1. Generate the default query and then modify it. This ensures none of the ports in the lookup are missed.

2. Use same SQL override for each lookup transformation that uses a shared cache.

3. While overriding the order by clause ensure the order of the columns is same as in the lookup ports and also suppress the default Order By clause by using comments notation. Otherwise the session will fail.

Hope this helps you in configuring your lookup overrides. For any more information leave a comment and I will respond.

How to improve performance of a lookup by using “Pre-build Lookup Cache” option?

By default Informatica Integration service starts building the lookup cache only when the first input row is received by the lookup transformation during the session execution. This may sometimes cause the session to wait until the cache is build especially for large lookup files or complex lookup queries.

In order to start building the lookup cache as soon as the session starts you can:-

  • configure the lookup property “Pre-build Lookup Cache
  • at mapping or session level
  • Integration service uses session level setting if you configure this option as Auto at the mapping level

There are three options you can set for this property:-

  1. Auto – Integration Service uses the session level setting
  2. Always Allowed – Integration Service creates an additional pipeline to build the cache even before the first row is received by the lookup transformation.
  3. Always Disallowed – Integration Service cannot pre-build the cache.

In order for this property to take effect you must configure the session property – “Additional Concurrent Pipelines for Lookup Cache Creation”

  • This property configures the number of pipelines the Integration service can build concurrently.
  • Its value should be greater than zero for the pre-build cache option to take effect.

I hope this helps you improve your session performance. Leave a comment if you need any more details on this property.

What is a pipeline lookup and when to use it?

A pipeline lookup transformation uses a source qualifier as its source. It sources data from a source qualifier in a separate pipeline in the mapping.

In this type of lookup you create an additional pipeline from the lookup source using a source qualifier. This pipeline does not contain any other transformation and is also called a partial pipeline.

After this you just need to set the source type attribute to be the source qualifier in the session properties of the lookup transformation. The lookup cache will get populated from the result of the source qualifier.

When to use this type of lookup?

1. Use it when the lookup source is not a relational or flat file.

2. When you need to improve the performance of the mapping having lookups on relational or flat file sources as you can utilise partitioning to speed up the lookup cache creation via source qualifier pipeline.

Things to remember when using this type of lookup arrangement

1. You cannot configure the target load plan of the partial pipeline

2. Do not enable High Availablity recovery for sessions that have real time sources for pipeline lookup as it may produce unpredictable results.

Leave a comment if you need any more details regarding the configuration of such mappings