Finally we have reached the 6th and the last part of this series. We have already installed everything and now we need to test it. Please see previous posts if you are catching on from here
- How to get and unpack the legitimate copies of the software packages (see Part 1)
- How to install Oracle 11g and create a database for Informatica repository and domain (see Part 2)
- How to install Informatica 9.6.1 server software (see Part 3)
- How to install Informatica 9.6.1 client software (see Part 4)
- How to create Informatica repository and integration services (see Part5)
- How to test whether the setup is working
Click here for previous post which describes How to create Informatica repository and integration services.
In this final post I will describe how to connect Informatica clients to your server and create and run a test mapping.
STEP1:- Fire up Informatica Repository Manager by going to All Programs-> Informatica 9.6.1-> Client -> PowerCenter Client-> Repository Manager
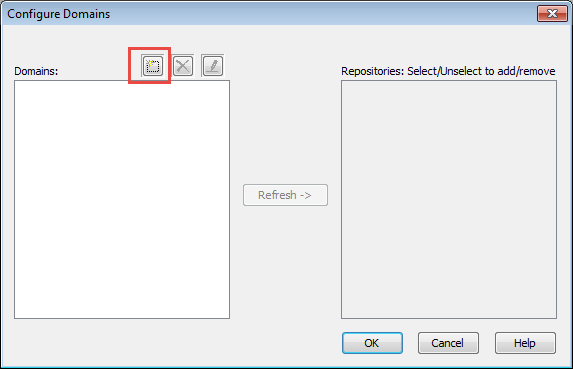
Goto the Repository Menu and click on Configure Domains. You will get the following window. In this window click on the create button inside the red square
Fill in the details as in the screenshot below and click ok. The Details in this screen should match the details you provided while installing the Informatica server. See Part 3 Step 10.

STEP2:- Select the repository from the right hand pane and press Ok
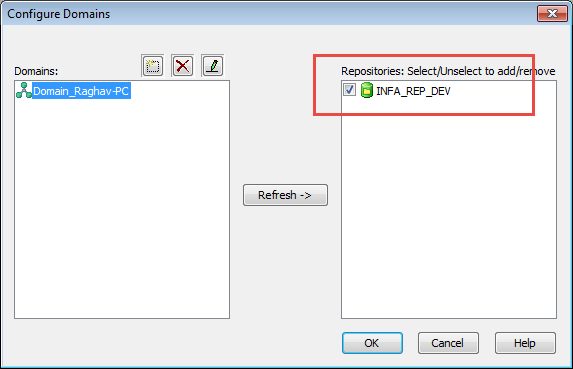
Now you will get the INFA_DEV_REP repository listed on the left hand navigator in Repository Manager
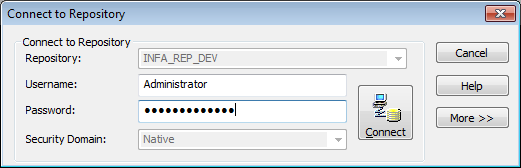
STEP3:- Create a Development folder where we will create our code components for testing. Still In the repository manager connect to the INFA_DEV_REP repository by double clicking the repository icon in the navigator menu. Supply Administrator credentials to login.
STEP4:- Go to folder menu in Repository Manager and provide the folder name to create and press OK

You will see the folder now created inside the INFA_DEV_REP repository.
STEP5:- Goto Informatica Designer and login to the repository with Administrator credentials. Create a simple source file to target file one to one mapping in the folder we created in previous step

STEP6:- Goto Informatica Worklfow Manager and create a workflow for this mapping and configure the source and target information in mapping tab

STEP7:- Execute the workflow and check the status in Workflow Monitor

Well this concludes a fairly long process of getting your own copy of Informatica to play with.
Please do provide your feedback and comments if you have any suggestions. You can write to me at raghavatalblog@gmail.com or follow me on twitter @atalraghav
Happy Learning!!
Hi Raghav,
First of all I just want to thank for this awesome tutorial you create. I can see it took you a lot of time to create this. I am totally novice to informatica but by following your tutorial I was able to have a successful install.
The only problem I faced was during the final step where I could not test the installation because I don’t know how to create the flat file mapping you describe. If you could elaborate a bit about the Informatica designer step, that would be great.
But so far, kudos to you for this great job.
Thank you.
Thanks Edem. Sure I will elaborate more on creating a simple mapping in my upcoming post. Many thanks for your feedback. please subscribe to be notified when its up.
This is the best post I have ever seen….End to end with minute details described at each level…Appreciate your patience…..
Really awesome…and it was helpful.
And one more thing, I installed on Window 10 Home OS.
Only one issue I had was, I could not install Oracle 11 g on this OS. I installed Oracle 12c and followed the remaining steps and it was very easy…Once again, thanks a lot bro!!!
Hi Ragav,
Thank you so much for all your effort on sharing this useful technical stuff. You really helped many people by sharing this info. God bless you.
Thanks
That was great, nice journey! The only thing that is missing: Just download 32-bits of both-Oracle 11g and Informatica. 64-bit infa server was not starting for me, I mean services. Then 32-bit is, but then you also need to have 32-bit Oracle 11g in order to create repository…
hi all,
this is just for reference, some issues i faced during this installation process.
Problem 1. I already had Oracle 12c installed on my machine, so i tried to use same than re-installing 11g. But i was not able to connect database during set-up process
reason Informatica is still not compatible with Oracle 12c.
So, i have to install Oracle 11g.
Note: Please install Oracle 11g 32 bit/64 bit only based on what version of Informatica installed on your machine else it will cause issue while starting repository services via Informatica Administrator web page.
Problem 2: Informatica Integration Services not getting enabled , error LM_36011
to resolve this you need to set “Code Page” under Integration Services –>Process–>General Properties–>Code Page from Informatica Administrator web page same as set under Informatica repository.
Problem 3: Unable to create folder in Repository
It may be due to repository services running under Exclusive mode.
Problem 4: Informatica Repository was unable to change from Exclusive to Normal mode.
to resolve this you need to create repository content via Action–>Repository–>Create repository content.
Once this is done you will be able to change to Normal mode.
Hope this will be helpful in case such issue.
Thank you
Tausif
Raghav ,
This is a great effort , appreciate it .
Thanks
Rajesh
Raghav
I really appreciate your effort of describing the complete Informatica powercenter installation process along with proper screenshots. That’s really help a lot. If possible can you plz also share the same installation process of Informatica IDQ.
Thanks
Neeraj
Awesome….Was struggling to get the set up ..this post help me .Now successfully installed.
You have done a great job. Installed 32 bit version on Windows 10 Home OS. Working Smoothly.
Thanks Raghav.
Great article!! helped a lot. Thank you.
This is the best post
I have tried many other sites with other combinations wasted lot of time ..its really good with screenshots and minute details…Very much appreciate your work